
4.2
Owner's of the Amana Range AGG222VDW gave it a score of 4.2 out of 5. Here's how the scores stacked up:


11
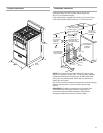
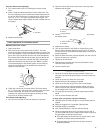
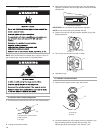
2. Open oven door and remove oven racks, oven tray, flame
spreader and set aside.
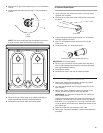
3. Locate the air shutter near the rear wall of oven and loosen
the shutter screw.
4. Adjust the air shutter.
5. Turn the oven back on and check for proper flame. If the
flame is still not properly adjusted, turn the oven off, wait for
the oven burner to cool down and repeat Step 4 until flame is
properly adjusted.
6. When the flame has been properly adjusted, turn the oven off,
wait for the burner to cool down.
7. Tighten the shutter screw.
8. Reinstall flame spreader and oven tray. Reinstall the oven
racks and close oven door.
9. Close the broiler door.
Complete Installation
1. Check to be sure all parts are now installed. If there is an
extra part, go back through the steps to see which step was
skipped.
2. Check to be sure you have all of your tools.
3. Dispose of/recycle all packaging materials.
4. Check to be sure the range is level. See “Level Range.”
5. Use a mild solution of liquid household cleaner and warm
water to remove waxy residue caused by shipping material.
Dry thoroughly with a soft cloth.
6. For range use and cleaning, read the range Use and Care
Guide.
7. Turn on surface burners and oven.
If range does not operate, check the following:
■ Household fuse is intact and tight; or circuit breaker has not
tripped.
■ Range is plugged in to a grounded 3 prong outlet.
■ Electrical supply is connected.
■ See “Troubleshooting” in the Use and Care Guide.
■ When the range has been on for 5 minutes, feel for heat. If
you do not feel heat, turn the range off and check to see that
the gas supply line shutoff valve is open.
■ If the gas supply line shutoff valve is closed, open it, then
repeat the 5-minute test as outlined above.
■ If the gas supply line shutoff valve is open, contact a
qualified technician.
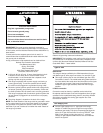
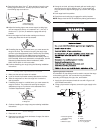
If the low flame needs adjusting:
1. Turn control knob to the “LO” setting and remove control
knob.
2. Insert a small flat-blade screwdriver into the valve stem. Turn
the valve adjusting screw to obtain the smallest flame that will
not go out when the control of a cold burner is quickly turned
from “HI” to “LO.” Turn right to decrease flame height. Turn
left to increase flame height. Repeat for other cooktop burners
as needed.
3. Replace control knob.
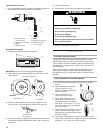
Check Operation of Oven/Broil Burner
Manifold panel oven control:
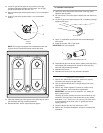
1. Open broiler door.
2. Push and turn the oven control knob to 350°F. The oven
burner should light in 20-40 seconds, this delay is normal. The
oven valve requires a certain time before it will open and allow
gas to flow. The oven burner will burn until oven temperature
has reached 350°F. After 20-40 seconds, the oven burner will
begin to cycle on and off to maintain the 350°F temperature.
Make this verification with the knob in the “BROIL” position.
To avoid damaging the hot surface igniter, do not insert any
object into the openings of the shield that surrounds the
igniter or clean that area.
3. Check the oven burner for proper flame. The flame should
be
1
⁄2" (1.3 cm) long, with inner cone of bluish-green, and outer
mantle of dark blue, and should be clean and soft in
character. No yellow tips (not enough air), blowing or lifting
(too much air) of flame should occur.
If the flame needs adjusting:
1. Turn the oven off. Wait for the oven burner to cool down.
B
C
A
A
A. Oven tray (lift up at area shown to remove)
B. Screws
C. Flame spreader
A
B
A. Shutter screw
B. Air shutter
350
450
OFF
140
170
200
250
300
350
400
BROIL
OVEN TEMP
A. Valve stem
A


Find Your Products By Category
- Lawn and Garden
- Computer Equipment
- TV and Video
- Laundry Appliance
- Kitchen Appliance
- Car Audio and Video
- Automotive
- Photography
- Fitness & Sports
- Personal Care
- Communications
- Home Audio
- Portable Media
- Musical Instruments & Equipment
- Baby
- Household Appliance
- Cell Phone
- Marine Equipment
- Outdoor Cooking
- Power Tools
- Video Game
Please Login
