
2.0
Owner's of the Canon Digital Camera Canon Eos 70d gave it a score of 2.0 out of 5. Here's how the scores stacked up:


140
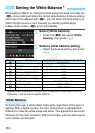
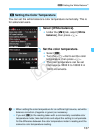
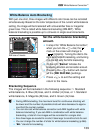
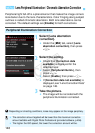
If the image comes out dark or the contrast is low, the brightness and
contrast can be corrected automatically. This function is called Auto
Lighting Optimizer. The default setting is [Standard]. With JPEG
images, the correction is applied when the image is captured.
In Basic Zone modes, [Standard] is set automatically.
1
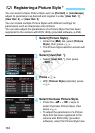
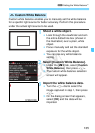
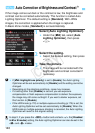
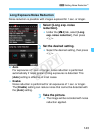
Select [Auto Lighting Optimizer].
Under the [z3] tab, select [Auto
Lighting Optimizer], then press
<0>.
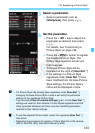
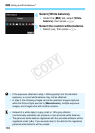
2
Select the setting.
Select the desired setting, then press
<0>.
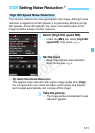
3
Take the picture.
The image will be recorded with the
brightness and contrast corrected if
necessary.
3
Auto Correction of Brightness and Contrast
N
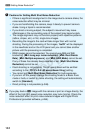
If [z4: Highlight tone priority] is set to [Enable], the Auto Lighting
Optimizer will be set automatically to [Disable] and the setting cannot be
changed.
Depending on the shooting conditions, noise may increase.
If a setting other than [Disable] is set and you use exposure
compensation or flash exposure compensation to darken the exposure,
the image may still come out bright. If you want a darker exposure, set
this function to [Disable].
If the HDR mode (p.172) or multiple-exposure shooting (p.175) is set, the
Auto Lighting Optimizer will be set automatically to [Disable]. When the
HDR mode or multiple-exposure shooting is canceled, the Auto Lighting
Optimizer will revert to the original setting.
In step 2, if you press the <B> button and uncheck <X> the [Disabled
in M or B modes] setting, the Auto Lighting Optimizer can also be set in the
<a> and <F> modes.
COPY


Find Your Products By Category
- Lawn and Garden
- Computer Equipment
- TV and Video
- Laundry Appliance
- Kitchen Appliance
- Car Audio and Video
- Automotive
- Photography
- Fitness & Sports
- Personal Care
- Communications
- Home Audio
- Portable Media
- Musical Instruments & Equipment
- Baby
- Household Appliance
- Cell Phone
- Marine Equipment
- Outdoor Cooking
- Power Tools
- Video Game
Please Login
