

0
Owner's of the Meade Weather Radio Meade Instruments Weather Radio gave it a score of 0 out of 5. Here's how the scores stacked up:


BATTERY INSTALLATION
• Remove the battery door located at the back of the main unit.
• Insert two (2) AA batteries and replace the battery compartment door.
PLACEMENT
• Make sure that the main unit is locating within the operating range of all remote sensors.
• Ideally the main unit should be placed within line of sight of remote sensors. Avoid placing
the main unit where surfaces emitting and radiating heat (e.g. heating ducts or air conditioners)
and areas with interference from wireless devices (e.g. cordless phones, radio headsets, baby
monitoring devices and other electronics).
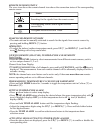
OPERATION
Once the main unit is powered, the display will show all available LCD segments for a moment.
IMPORTANT: All of the display functions will be locked, allowing setting of your local
altitude and pressure parameters by pressing the UP (? ) or DOWN (? ) and SET buttons. The
locked display will show the pressure icon and abbreviation “inHg” flashing in the
Weather Forecast/ Pressure Window, default time in Clock Window and channel 1’s
temperature and humidity readings in Temperature/ Humidity Window.
If pressure and altitude are not configured during this time, the unit will self-calibrate in a few
minutes and show the default settings for the pressure and altitude (sea level) and all remote
weather sensors readings.
GETTING STARTED
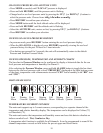
WEATHER FORECAST
This unit is capable of detecting the atmospheric pressure changes. Based on collected weather
data, it forecasts the weather for the next 12 to 24 hours.
NOTE: The weather forecast accuracy is approximately 70%.
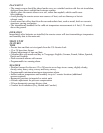
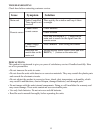
The main unit display shows forecasted (predicted) not current conditions. The SUNNY
icon indicates clear weather, even when displayed during the nighttime.
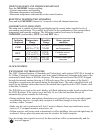
When the
display
shows...
Forecast
is...
Sunny
Partly
Cloudy
Heavy
Rainy
Heavy
Snowy
Cloudy Rainy Snowy
8
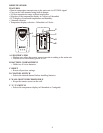
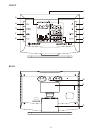
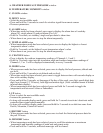
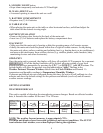
L. SNOOZE/ LIGHT button
• Stops alarm temporarily and activates LCD backlight
M. WALL-MOUNT hole
• A recessed opening to mount the unit on a wall
N. BATTERY COMPARTMENT
• Requires two (2) AA batteries
O. TABLE STAND
• When placing the main unit on the table or other horizontal surface, unfold and adjust the
table stand for the desired viewing angle.


Find Your Products By Category
- Lawn and Garden
- Computer Equipment
- TV and Video
- Laundry Appliance
- Kitchen Appliance
- Car Audio and Video
- Automotive
- Photography
- Fitness & Sports
- Personal Care
- Communications
- Home Audio
- Portable Media
- Musical Instruments & Equipment
- Baby
- Household Appliance
- Cell Phone
- Marine Equipment
- Outdoor Cooking
- Power Tools
- Video Game
Please Login
