
0
Owner's of the Sony Portable Speaker Sony Personal Audio System gave it a score of 0 out of 5. Here's how the scores stacked up:
English
Manuals Supplied
Startup Guide (this document)
Provides you with instructions on how to connect the
unit with BLUETOOTH devices and basic operations.
Reference Guide
Provides you with precautions and product
specifications.
Help Guide
Read the Help Guide on your computer or smartphone
when you want to know how to use the unit in greater
detail. The Help Guide also contains a troubleshooting
guide which provides you with remedies for the
problems you might encounter.
URL:
http://rd1.sony.net/help/speaker/srs-x11/h_zz/
Two-dimensional code:
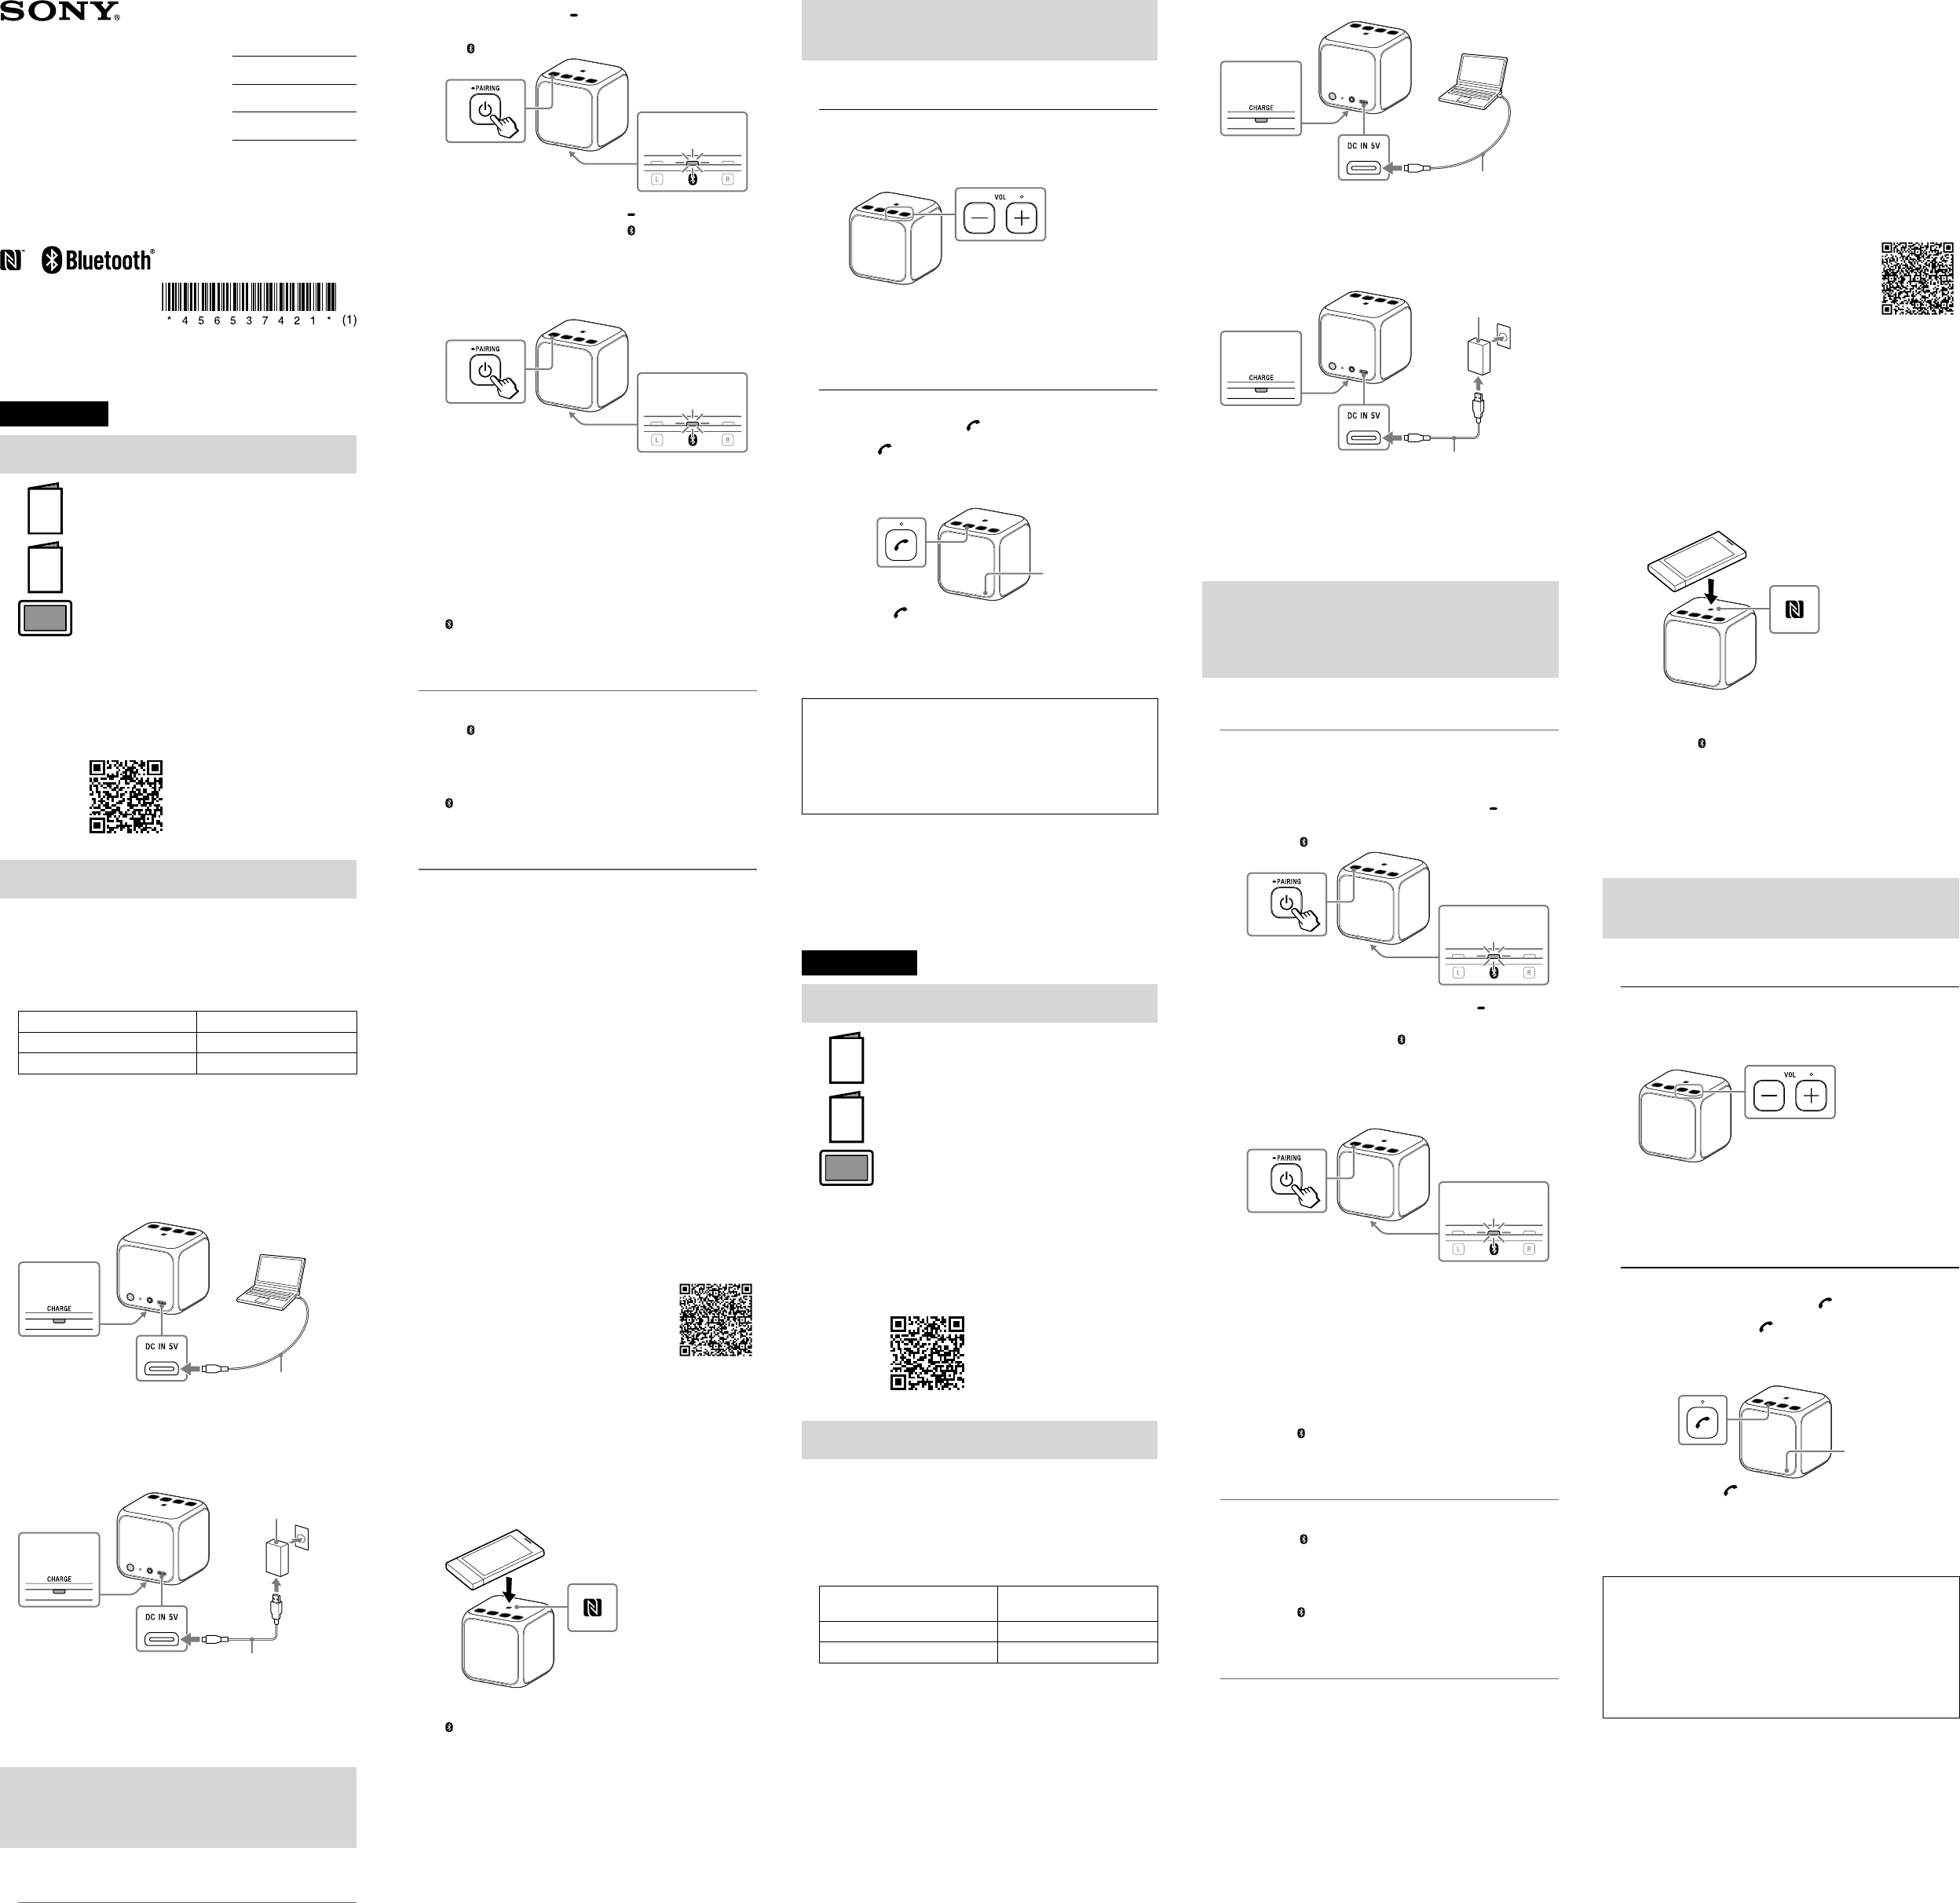
Charging the Unit
This unit has a built-in lithium-ion rechargeable battery. Charge
the battery before using the unit for the first time.
When the unit is turned off and connected to a booted PC or an AC
outlet, the CHARGE indicator lights up in orange. The CHARGE
indicator will turn off when charging is completed.
The charging time depends on the power output capacity of the
connected device.
Power output capacity Estimated charging time*
Ability to output in 1.5 A About four hours
Ability to output in 500 mA About eight hours
* The time stated above may vary depending on the ambient
temperature or conditions of use.
Hint
A unit that is in use can be charged if it is connected to a booted PC or
an AC outlet, though the CHARGE indicator does not light up. In this
case, it may take longer to charge its battery than the ones stated
above depending on the conditions of use. Therefore, it is
recommended to turn off the unit when charging.
To charge the battery from a PC
Micro-USB
cable (supplied)
DC IN
Lit
(orange)
Hint
The power output capacity varies depending on the PC. For details on
your PC’s power output, refer to the operating instructions supplied
with your PC.
To charge the battery from an AC outlet
USB AC adaptor
(commercially-available)
Micro-USB
cable (supplied)
DC IN
Lit
(orange)
Hint
A commercially-available USB AC adaptor with a power output of 1.5 A or
more is recommended for use, though a USB AC adaptor with a power
output of more than 500 mA, but less than 1.5 A is also compatible with the
unit. Charging using other types of adaptors is not covered by the warranty.
How to Make a Wireless Connection with
BLUETOOTH Devices
Select your case from the three pairing types below. BLUETOOTH
devices need to be “paired” with each other beforehand.
Pairing and connecting with a
BLUETOOTH device
The unit can be paired with up to eight BLUETOOTH devices. When
pairing with two or more BLUETOOTH devices, perform the
following pairing procedure for each device.
1
Press the (power) PAIRING button to turn on
this unit.
The (BLUETOOTH) indicator begins to flash.
Flashing
(white)
2
Press and hold the (power) PAIRING button
until beeps are heard and the (BLUETOOTH)
indicator begins to flash quickly.
The unit enters pairing mode.
Hint
When you turn on the unit for the first time, it enters pairing mode
automatically.
Fast flashing
(white)
3
Perform the pairing procedure on the BLUETOOTH
device to detect this unit.
When a list of detected devices appears on the display of the
BLUETOOTH device, select “SRS-X11.”
If passkey input is required on the display of a BLUETOOTH
device, input “
0000.”
4
Make the BLUETOOTH connection from the
BLUETOOTH device.
When the BLUETOOTH connection is established, the
(BLUETOOTH) indicator on the unit stays lit.
Connecting with a paired
BLUETOOTH device
1
Turn on this unit.
The (BLUETOOTH) indicator begins to flash.
2
Make the BLUETOOTH connection from the
BLUETOOTH device.
When the BLUETOOTH connection is established, the
(BLUETOOTH) indicator on the unit stays lit.
Connecting with a smartphone by
One-touch (NFC)
By touching the unit with a smartphone, the unit is turned on
automatically and then proceeds to pairing and BLUETOOTH
connection.
Compatible smartphones
NFC-compatible smartphones with Android 2.3.3 or later installed
NFC
NFC(Near Field Communication) is a technology enabling
short-range wireless communication between various devices,
such as smartphones and IC tags. Thanks to the NFC function, data
communication - for example, BLUETOOTH pairing - can be
achieved easily by simply touching NFC-compatible devices
together (i.e., at the N-Mark symbol or location designated on
each device).
1
Set the NFC function of the smartphone to on.
For details, refer to the operating instructions supplied with
the smartphone.
•If your smartphone OS is Android 2.3.3 or later and less than
Android 4.1, proceed to step 2.
•If your smartphone OS is Android 4.1 or later, proceed to step 4.
2
Download and install the app “NFC Easy Connect.”
“NFC Easy Connect” is a free Android app you can download
from Google Play.
Download the app by searching for “NFC Easy Connect” or
access it by using the following two-dimensional code. Fees
may be charged for downloading the app.
To download by the two-dimensional
code, use a two-dimensional code
reader app.
Note
The app may not be available in some countries and/or regions.
3
Start “NFC Easy Connect” on the smartphone.
Make sure that the app screen is displayed.
4
Touch this unit with the smartphone.
Unlock the screen of the smartphone beforehand.
Keep touching the smartphone on the N marked part of the
unit until the smartphone responds. If the unit is off, it will
turn on when the smartphone touches it.
Smartphone responds
(unit recognized)
Follow the on-screen instructions to establish the connection.
When the BLUETOOTH connection is established, the
(BLUETOOTH) indicator on the unit stays lit.
To disconnect, touch the unit with the smartphone again.
Hints
If you cannot connect the unit, try the following.
•Start the app on the smartphone and move the smartphone
slowly over the N marked part of the unit.
•If the smartphone is in a case, remove it from the case.
•Make sure that the app screen is displayed on the smartphone.
Listening and Calling
Operate the unit after making the BLUETOOTH connection with your
BLUETOOTH device.
Listening to music
Profile: A2DP, AVRCP
Start playback on the BLUETOOTH device and adjust the
volume.
Set the volume at an appropriate level on the connected device
and adjust the volume with the VOL –/+ buttons on the unit.
The VOL + button has a tactile dot.
Hint
For details concerning playback through connection via the AUDIO IN
jack, refer to the Help Guide.
Making a call/Receiving a call
Profile: HSP, HFP
Operate your smartphone to make a call.
To terminate a call, press the (call) button on the unit.
Press the (call) button on the unit when an incoming
call arrives.
Operate in the same way when an incoming call arrives while you
are listening to music.
The (call) button has a tactile dot.
Microphone
Hint
When a portable audio device, etc. is connected to the AUDIO IN jack,
the unit automatically switches to the AUDIO IN mode. In this case,
sound from the BLUETOOTH-connected device is not output from the
unit, but handsfree calling is available.
By connecting two SRS-X11 units via BLUETOOTH, you can select
audio reproduction between the stereo mode (stereo sound)
and double mode (same sound is output from two units
simultaneously). To use this function (speaker add function),
two SRS-X11 units are required.
For more information, see Help Guide on the following website:
http://rd1.sony.net/help/speaker/srs-x11/h_zz/
•The BLUETOOTH® word mark and logos are owned by the Bluetooth
SIG, Inc. and any use of such marks by Sony Corporation is under
license.
•The N Mark is a trademark or registered trademark of NFC Forum, Inc.
in the United States and in other countries.
•Android™ and Google Play™ are trademarks of Google Inc.
•Other trademarks and trade names are those of their respective
owners.
Français
Manuels fournis
Guide de démarrage (le présent document)
Ce guide fournit des instructions sur la procédure de
connexion de l’appareil aux périphériques BLUETOOTH
et décrit les fonctions de base.
Guide de référence
Ce guide fournit les spécifications du produit et vous
informe des précautions à prendre pour l’utiliser.
Guide d’aide
Consultez le Guide d’aide sur votre ordinateur ou votre
smartphone lorsque vous voulez utiliser les fonctions
plus avancées de l’appareil. Le Guide d’aide contient
également un guide de dépannage qui propose des
solutions aux problèmes que vous pouvez rencontrer.
URL:
http://rd1.sony.net/help/speaker/srs-x11/h_zz/
Code en deux dimensions:
Chargement de l’appareil
L’appareil est équipé d’une batterie rechargeable lithium-ion
intégrée. Rechargez la batterie avant d’utiliser l’appareil pour la
première fois.
Quand l’appareil est hors tension et connecté à un PC actif ou à
une prise secteur, le témoin CHARGE s’allume en orange. Le
témoin CHARGE s’éteint quand le chargement est terminé.
La durée de chargement dépend de l’intensité de sortie
d’alimentation du périphérique connecté.
Intensité de sortie
d’alimentation
Durée de chargement
estimée*
Intensité de sortie de 1,5 A Environ quatre heures
Intensité de sortie de 500 mA Environ huit heures
* La durée mentionnée ci-dessus peut varier en fonction de la
température ambiantes ou des conditions d’utilisation.
Conseil
Un appareil en cours d’utilisation peut être rechargé s’il est connecté à
un PC actif ou à une prise secteur, même si le témoin CHARGE ne
s’allume pas. Selon les conditions d’utilisation, la durée de chargement
de la batterie peut alors être supérieure à celles mentionnées ci-dessus.
Il est dès lors recommandé de mettre l’appareil hors tension lorsque
vous le rechargez.
Pour charger la batterie à partir d’un PC
Câble micro-USB (fourni)
ENTRÉE CC
Allumé
(orange)
Conseil
L’intensité de sortie d’alimentation varie selon le PC. Pour plus
d’informations sur la sortie d’alimentation de votre PC, reportez-vous au
mode d’emploi fourni avec celui-ci.
Pour charger la batterie à partir d’une prise secteur
Adaptateur secteur USB
(disponible dans le commerce)
Câble micro-USB (fourni)
ENTRÉE CC
Allumé
(orange)
Conseil
Il est recommandé d’utiliser un adaptateur secteur USB du commerce
dont l’intensité de sortie d’alimentation est de 1,5 A ou davantage, bien
qu’un adaptateur secteur USB d’une intensité de sortie d’alimentation
supérieure à 500 mA, mais inférieure à 1,5 A, soit également compatible
avec l’appareil. La garantie ne couvre pas le chargement au moyen
d’autres types d’adaptateurs.
Comment établir une connexion sans fil
avec des périphériques BLUETOOTH
Parmi les trois types de jumelage ci-dessous, sélectionnez celui qui
correspond à votre cas. Les périphériques BLUETOOTH doivent être
préalablement «jumelés» l’un à l’autre.
Jumelage et connexion à un
périphérique BLUETOOTH
L’appareil peut être jumelé à huitpériphériques BLUETOOTH
maximum. En cas de jumelage à deux périphériques BLUETOOTH
ou davantage, appliquez la procédure de jumelage suivante pour
chaque périphérique.
1
Appuyez sur la touche (alimentation) PAIRING
pour mettre cet appareil sous tension.
Le témoin (BLUETOOTH) se met à clignoter.
Clignote
(blanc)
2
Maintenez la touche (alimentation) PAIRING
enfoncée jusqu’à l’émission de signaux sonores et
jusqu’à ce que le témoin (BLUETOOTH) se mette à
clignoter rapidement.
L’appareil passe en mode de jumelage.
Conseil
La première fois que vous mettez l’appareil sous tension, il passe
automatiquement en mode de jumelage.
Clignote rapidement
(blanc)
3
Effectuez la procédure de jumelage sur le
périphérique BLUETOOTH pour détecter cet appareil.
Lorsque la liste de périphériques détectés apparaît sur l’écran
du périphérique BLUETOOTH, sélectionnez «SRS-X11».
Si la saisie d’une clé d’authentification est requise sur l’écran
d’un périphérique BLUETOOTH, saisissez «
0000».
4
Établissez la connexion BLUETOOTH à partir du
périphérique BLUETOOTH.
Lorsque l’appareil est connecté au périphérique BLUETOOTH,
le témoin
(BLUETOOTH) de l’appareil reste allumé.
Connexion à un périphérique
BLUETOOTH jumelé
1
Mettez cet appareil sous tension.
Le témoin (BLUETOOTH) se met à clignoter.
2
Établissez la connexion BLUETOOTH à partir du
périphérique BLUETOOTH.
Lorsque l’appareil est connecté au périphérique BLUETOOTH,
le témoin
(BLUETOOTH) de l’appareil reste allumé.
Connexion à un smartphone par
simple contact (NFC)
Si vous mettez l’appareil en contact avec un smartphone, il se met
automatiquement sous tension, puis effectue le jumelage et
établit la connexion BLUETOOTH.
Smartphones compatibles
Smartphones compatibles NFC avec Android2.3.3 ou ultérieur installé
NFC
La NFC (Near Field Communication, communication en champ
proche) est une technologie permettant d’établir une
communication sans fil à courte portée entre différents
périphériques, comme les smartphones et les étiquettes CI. Grâce
à la fonction NFC, la communication des données (par exemple, le
jumelage BLUETOOTH) peut être facilement réalisée en mettant
simplement en contact des périphériques compatibles NFC
(autrement dit, au niveau du symbole N-Mark ou de
l’emplacement désigné sur chaque appareil).
1
Activez la fonction NFC du smartphone.
Pour plus de détails, reportez-vous au mode d’emploi fourni
avec le smartphone.
•Si le système d’exploitation de votre smartphone est
Android2.3.3 ou une version ultérieure, mais antérieure à
Android4.1, passez à l’étape2.
•Si le système d’exploitation de votre smartphone est Android4.1
ou une version ultérieure, passez à l’étape 4.
2
Téléchargez et installez l’application «Connexion
NFC facile».
«Connexion NFC facile» est une application Android gratuite
que vous pouvez télécharger sur Google Play.
Téléchargez l’application en recherchant «Connexion NFC
facile» ou accédez-y à l’aide du code en deux dimensions
suivant. Le téléchargement de l’application peut être payant.
Pour télécharger à l’aide du code en
deux dimensions, utilisez une
application de lecture de code en
deuxdimensions.
Remarque
Il est possible que l’application ne soit pas disponible dans
certains pays et/ou dans certaines régions.
3
Démarrez l’application «Connexion NFC facile» sur
le smartphone.
Vérifiez que l’écran de l’application est affiché.
4
Mettez cet appareil en contact avec le smartphone.
Déverrouillez préalablement l’écran du smartphone.
Maintenez le contact avec le smartphone sur la zone de
l’appareil marquée N jusqu’à ce que le smartphone réagisse.
Si l’appareil est hors tension, il se met sous tension lorsque le
smartphone entre en contact avec lui.
Le smartphone réagit
(appareil reconnu)
Pour établir la connexion, conformez-vous aux instructions
affichées.
Lorsque l’appareil est connecté au périphérique BLUETOOTH,
le témoin
(BLUETOOTH) de l’appareil reste allumé.
Pour le déconnecter, mettez-le à nouveau en contact avec le
smartphone.
Conseils
Si vous ne parvenez pas à connecter l’appareil, essayez ce qui suit.
•Démarrez l’application sur le smartphone et déplacez lentement
le smartphone par-dessus la zone de l’appareil marquée N.
•Si le smartphone se trouve dans un étui, sortez-le de celui-ci.
•Vérifiez que l’écran de l’application est affiché sur le smartphone.
Écoute et appel
Utilisez l’appareil après avoir établi la connexion BLUETOOTH avec
votre périphérique BLUETOOTH.
Écoute de musique
Profil: A2DP, AVRCP
Démarrez la lecture sur le périphérique BLUETOOTH et
réglez le volume.
Réglez le volume à un niveau correct sur le périphérique connecté
et réglez le volume à l’aide des touches VOL –/+ de l’appareil.
La touche VOL + possède un point tactile.
Conseil
Pour plus d’informations sur la lecture par l’intermédiaire de la prise
AUDIO IN, reportez-vous au Guide d’aide.
Émission/réception d’un appel
Profil : HSP, HFP
Utilisez votre smartphone pour émettre un appel.
Pour raccrocher, appuyez sur la touche (appel) de l’appareil.
Appuyez sur la touche (appel) de l’appareil quand
vous recevez un appel.
Procédez de la même manière quand vous recevez un appel alors
que vous écoutez de la musique.
La touche (appel) possède un point tactile.
Micro
Conseil
Quand un périphérique audio portable, par exemple, est raccordé à la
prise AUDIO IN, l’appareil bascule automatiquement en mode AUDIO IN.
L’appareil cesse alors de reproduire le son provenant du périphérique
BLUETOOTH connecté, mais l’appel mains libres est possible.
En connectant deux appareils SRS-X11 par l’intermédiaire du
BLUETOOTH, vous pouvez sélectionner la reproduction du son
en mode stéréo (son stéréo) et en mode double (reproduction
simultanée du même son par les deux appareils). Pour utiliser
cette fonction (fonction d’ajout d’enceinte), vous devez disposer
de deux appareils SRS-X11.
Pour plus d’informations, consultez le Guide d’aide sur le site
Web suivant:
http://rd1.sony.net/help/speaker/srs-x11/h_zz/
•La marque BLUETOOTH® et les logos appartiennent à Bluetooth SIG, Inc.
et doivent être utilisés par Sony Corporation uniquement sous licence.
•Le repère N-Mark est une marque commerciale ou une marque
déposée de NFC Forum, Inc., aux États-Unis et dans d’autres pays.
•Android™ et Google Play™ sont des marques commerciales de
Google Inc.
•Les autres marques commerciales et noms commerciaux
appartiennent à leurs propriétaires respectifs.
Personal Audio
System
Startup Guide
Guide de démarrage
Einführungsanleitung
Guía de inicio
4-565-374-21(1)
©2015 Sony Corporation Printed in China
SRS-X11


Find Your Products By Category
- Lawn and Garden
- Computer Equipment
- TV and Video
- Laundry Appliance
- Kitchen Appliance
- Car Audio and Video
- Automotive
- Photography
- Fitness & Sports
- Personal Care
- Communications
- Home Audio
- Portable Media
- Musical Instruments & Equipment
- Baby
- Household Appliance
- Cell Phone
- Marine Equipment
- Outdoor Cooking
- Power Tools
- Video Game
Please Login
