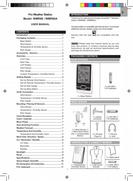

0
Owner's of the Oregon Scientific Marine Radio Oregon Scientic Pro Weather Station gave it a score of 0 out of 5. Here's how the scores stacked up:

5
EN
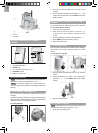
2. Insert the batteries, matching the polarities (+ / -).
3. Press RESET after each battery change.
4. Close the battery door.
NOTE Do not use rechargeable batteries. It is
recommended that you use alkaline batteries with this
product for longer performance.
NOTE Batteries should not be exposed to excessive
heat such as sunshine or fire.
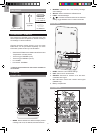
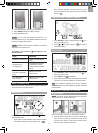
The battery icon indicator
may appear in the
following areas:
AREA MEANING
Weather Forecast Area
Battery in the base station
is low.
Temperature or
Humidity Area
The displayed channel
indicates the outdoor
sensor for which battery
is low.
Wind Speed / Wind
Direction / Wind Chil
Area
Battery in the wind
sensor is low.
UVI / Barometer /
Rainfall Area
Battery in the UV / Rain
sensor is low.
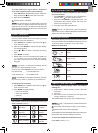
VERIFY CONNECTION
Before proceeding to install sensors outside, please verify
communication to the base station.
WIND SENSOR
Press SELECT until the selected area icon is in the
middle display area.
• Wind speed: Gently rotate the wind vane and confirm
a numerical reading on the base station, e.g.,
.
• Wind direction indicator. Move the direction of the
wind indication and verify the icon moves in the same
direction .
TEMPERATURE / HUMIDITY SENSOR
1. Press SELECT until the selected area icon is in
the upper display area.
2. Press / to select channel 1 and verify a
numerical reading.
RAIN GAUGE
1. Press SELECT until the selected area icon is in
the lower display area.
2. Press MODE until is displayed.
3. Tilt the tipping funnel on the rain gauge several times
and verify a numerical reading on the base station.
TIP If no reading is displayed for a sensor, press the
SEARCH button on the base station to initiate a wireless
sensor search.
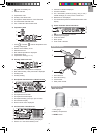
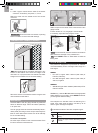
MOUNTING / PLACING OF SENSORS
WIND SENSOR
NOTE The sensor should be positioned in an open area
away from trees or other obstructions.
a
b
Secure the sensor connector in the desired location:
a. Align the back of the sensor connector to an existing
pole. Secure in place by inserting the ends of the
U-bolt into the holes on the sensor connector and
securing it with washers and bolts.


Find Your Products By Category
- Lawn and Garden
- Computer Equipment
- TV and Video
- Laundry Appliance
- Kitchen Appliance
- Car Audio and Video
- Automotive
- Photography
- Fitness & Sports
- Personal Care
- Communications
- Home Audio
- Portable Media
- Musical Instruments & Equipment
- Baby
- Household Appliance
- Cell Phone
- Marine Equipment
- Outdoor Cooking
- Power Tools
- Video Game
Please Login
