

4.0
Owner's of the Pioneer Car Stereo System Pioneer Car Stereo System gave it a score of 4.0 out of 5. Here's how the scores stacked up:

Part Operation
k
FUNC-
TION
Press toselect functions.
l
LIST/
ENTER
Press todisplay the disc title,
track title, folder,or file list de-
pending on thesource.
Press todisplay the list de-
pending on thesource.
While in theoperating menu,
press to controlfunctions.
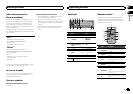
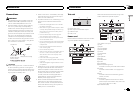
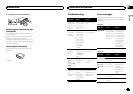
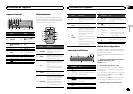
Display indication
21 53
7
4 6
8
Indicator State
1
(list)
The list functionis being oper-
ated.
2
Sub infor-
mation sec-
tion
Sub information isdisplayed.
3
(sound re-
triever)
The sound retriever function
is on.
4 LOC Local seek tuningis on.
5
(repeat) Track or folder repeatis on.
6
(ran-
dom)
Random playis on.
Indicator State
7
Main infor-
mation sec-
tion
! Tuner: band andfre-
quency
! CD player: elapsedplay-
back time andtext infor-
mation
8
Appears when alower tier of
folder or menuexists.
Set up menu
When you turn the ignition switch toON after in-
stallation, set up menu appears on the display.
You can set up the menu options below.
1 After installation of this unit, turn the
ignition switch to ON.
SET UP appears.
2 Turn M.C. to switch to YES.
# If you donot operate for 30seconds,the set up
menu will notbe displayed.
# If you prefernot to set upat this time, turnM.C.
to switch toNO. Press to select.
If you selectNO, you cannotset up in theset up
menu.
3 Press M.C. to select.
4 Complete the procedure outlined below
to set the menu.
To proceed to the next menu option,you need to
confirm your selection.
CLOCK SET (settingthe clock)
1 TurnM.C. to adjust hour.
2 Press M.C. toselect minute.
3 TurnM.C. to adjust minute.
4 Press M.C. toconfirm the selection.
QUITappears.
5 To finish your settings, turn M.C. to select
YES.
# If you preferto change your settingagain, turn
M.C. to switchto NO. Press to select.
6 Press M.C. to select.
Notes
! You can set up the menu options from the
system menu. For details about the settings,
refer to System menu on page 7.
! You can cancel set up menu by pressing
SRC/OFF.
Basic operations
Important
! Handle gently when removing or attaching
the front panel.
! Avoid subjecting the front panel to excessive
shock.
! Keep the front panel out of direct sunlight
and high temperatures.
! To avoid damaging the device or vehicle inte-
rior, remove any cables and devices attached
to the front panel before detaching it.
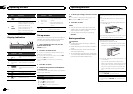
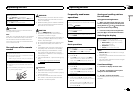
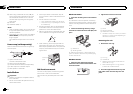
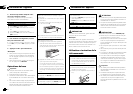
Removing thefront panel to protectyour unit from
theft
1 Press the detachbutton to release thefront
panel.
2 Push the frontpanel upward (M) andthen pull
it toward (N) you.
3 Always keep the detachedfront panel in apro-
tection device suchas a protection case.
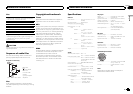
Re-attaching thefront panel
1 Slide the front panelto the left.
Make sure toinsert the tabs onthe left side of
the head unitinto the slots onthe front panel.
2 Press the rightside of the front paneluntil it is
firmly seated.
If you cannotattach the front panelto the
head unit successfully, makesure that you are
placing the frontpanel onto the headunit cor-
rectly.Forcing the frontpanel into place may
result in damageto the front panelor head
unit.
Turning the uniton
1 Press SRC/OFF toturn the unit on.
Turning the unitoff
1 Press and holdSRC/OFF until theunit turns
off.
Operating this unit
4
Section
Operating this unit
En
02


Find Your Products By Category
- Lawn and Garden
- Computer Equipment
- TV and Video
- Laundry Appliance
- Kitchen Appliance
- Car Audio and Video
- Automotive
- Photography
- Fitness & Sports
- Personal Care
- Communications
- Home Audio
- Portable Media
- Musical Instruments & Equipment
- Baby
- Household Appliance
- Cell Phone
- Marine Equipment
- Outdoor Cooking
- Power Tools
- Video Game
Please Login
