
0
Owner's of the Snow Joe Snow Blower 18-INCH 13-AMP ELECTRIC SNOW THROWER gave it a score of 0 out of 5. Here's how the scores stacked up:


13
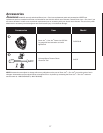
Maintenance
Lifetime Lubrication (Motor and Auger)
Lubrication is not necessary and may damage the unit. The
snow thrower is lubricated for lifetime use at the factory before
shipment.
General Maintenance Tips
1. Do not attempt to repair the machine unless you have the
proper tools and instructions for disassembly and repair of
the machine.
2. Check bolts and screws at frequent intervals for proper
tightness to ensure that the equipment is in safe working
condition.
3. After each snow removal session, run the snow thrower
for a few minutes to prevent the collector/impeller from
freezing. Shut o the motor, wait for all revolving parts to
stop completely, and wipe residual ice and snow o the
unit. Rotate the chute crank several times to remove any
excess snow.
4. Only use a cloth soaked with hot water and a soft brush to
clean the snow thrower; never wet or spray water on the
machine!
5. Do not use detergent or solvents as these could cause
irreparable damage to the snow thrower. Chemicals can
destroy the plastic parts.
6. To protect the snow thrower from corrosion when storing
for long periods, lightly oil the metal parts.
7. Store the appliance in a dry area out of reach of children.
8. For the user's safety, worn or damaged parts must be
replaced. Replace with original replacement parts only.
Parts from another snow thrower may not t properly,
causing an unsafe situation.
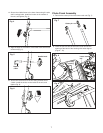
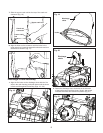
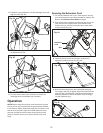
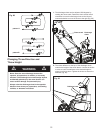
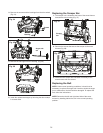
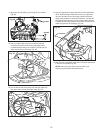
Replacing the Plastic Auger
NOTE: When replacing worn plastic plates, pay close attention
to any dierent types of bolts and nuts and where they are
positioned. This will ensure that the new plastic plates are
installed properly and securely.
1. Open the two side covers by removing the 5 screws on
each side (Figs. 31 – 32).
2. Remove the belt from the drive wheel on the left side
(Fig. 33).
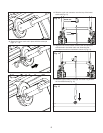
m WARNING m
Makesurethatthechutedeectorsnapsandlocks
completely onto the discharge chute. An opening
betweenthedischargechuteandthechutedeector
may allow foreign objects to be picked up by the
snow thrower and thrown in the direction of the
operator causing serious bodily injury.
• Donotadvancethechutedeectortoofar
forward causing an opening to appear between
the deectoranddischargechute.
• Do not overtighten the knobs on the chute
deector.
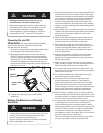
m WARNING m
Makesuretoturnotheswitchanddisconnectthe
extension cord before performing any maintenance
task on your snow thrower.
Fig. 31
ScrewsScrews
Fig. 32
Fig. 33
Belt


Find Your Products By Category
- Lawn and Garden
- Computer Equipment
- TV and Video
- Laundry Appliance
- Kitchen Appliance
- Car Audio and Video
- Automotive
- Photography
- Fitness & Sports
- Personal Care
- Communications
- Home Audio
- Portable Media
- Musical Instruments & Equipment
- Baby
- Household Appliance
- Cell Phone
- Marine Equipment
- Outdoor Cooking
- Power Tools
- Video Game
Please Login
