

1.3
Owner's of the Canon Digital Camera 8407B001 gave it a score of 1.3 out of 5. Here's how the scores stacked up:


162
1
2
3
4
5
6
7
8
9
10
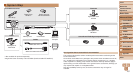
Cover
Before Use
Common Camera
Operations
Advanced Guide
Camera Basics
Auto Mode /
Hybrid Auto Mode
Other Shooting
Modes
Tv, Av, M, and
C Mode
Playback Mode
Wi-Fi Functions
Setting Menu
Accessories
Appendix
Index
Basic Guide
P Mode
Date-Based Image Storage
Instead of saving images in folders created each month, you can have the
camera create folders each day you shoot to store shots taken that day.
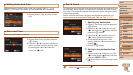
Choose [Create Folder], and then choose
[Daily].
Images will now be saved in folders
created on the shooting date.
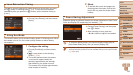
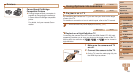
Metric / Non-Metric Display
Change the unit of measurement shown in the zoom bar (=
30), the MF
indicator (=
80), GPS information for elevation (=
153), and elsewhere
from m/cm to ft/in as needed.
Choose [Units], and then choose [ft/in].
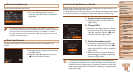
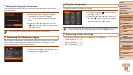
Electronic Level Calibration
Calibrate the electronic level if it seems ineffective in helping you level the
camera.
For greater calibration accuracy, display grid lines (=
98) to help you
level the camera in advance.
1 Make sure the camera is level.
Placethecameraonaatsurface,such
as a table.
2 Calibrate the electronic level.
Choose [Electronic Level], and then press
the <m> button.
Choose [Calibrate] and press the <m>
button.Aconrmationmessageis
displayed.
Choose [OK], and then press the <m>
button.
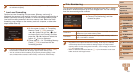
Resetting the Electronic Level
Restore the electronic level to its original state as follows. Note that this is
not possible unless you have calibrated the electronic level.
Choose [Electronic Level], and then press
the <m> button.
Choose [Reset], and then press the
<m> button.
Once the electronic level has been reset,
the menu screen is displayed again.


Find Your Products By Category
- Lawn and Garden
- Computer Equipment
- TV and Video
- Laundry Appliance
- Kitchen Appliance
- Car Audio and Video
- Automotive
- Photography
- Fitness & Sports
- Personal Care
- Communications
- Home Audio
- Portable Media
- Musical Instruments & Equipment
- Baby
- Household Appliance
- Cell Phone
- Marine Equipment
- Outdoor Cooking
- Power Tools
- Video Game
Please Login
