
0
Owner's of the Electrolux Clothes Dryer Electrolux Clothes Dryer gave it a score of 0 out of 5. Here's how the scores stacked up:


17
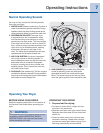
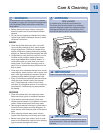
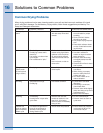
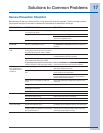
Solutions to Common Problems
Service Prevention Checklist
Before calling for service, review this list. It may save both time and expense. The list includes common
occurrences that are not the result of defective workmanship or materials in this dryer.
OCCURRENCE POSSIBLE CAUSE SOLUTION
Dryer does not start. Electrical power cord is not securely plugged
in or plug may be loose.
Make sure the plug fi ts tightly in wall outlet.
House fuse blown or circuit breaker tripped. Reset circuit breaker or replace fuse.
Make sure electrical line is not overloaded and the
dryer is on a separate circuit.
Thermal limiter tripped. Call authorized service person for replacement.
LCD displays
DEMO MODE.
Dryer has been programmed to temporarily
perform a repeating demo cycle.
To return to the factory default settings, press and hold
the temperature and dryness buttons at the same for 5
seconds.
Dryer runs but won’t
heat.
There are 2 house fuses in the dryer circuit. If 1
of the 2 fuses is blown, the drum may turn but
the heater will not operate. (electric models)
Replace fuse.
Gas supply valve is not open (gas models). Check to make sure supply valve is open. See INSTAL-
LATION INSTRUCTIONS for procedure.
Dryer does not have enough air supply to
support the burner fl ame (gas models).
See INSTALLATION INSTRUCTIONS.
LP gas supply tank is empty or there has been
a utility interruption of natural gas (gas models).
Refi ll or replace tank.
Dryer should heat when utility service is restored.
Drying cycle takes too
long, outside of the
dryer feels too hot or
smells hot.
Lint fi lter is clogged with lint. Make sure all lint has been removed from the dryer lint
fi lter before starting each cycle.
Exhaust duct requirements have not been
met.
Exhaust duct must be at least 4 inches in diameter and
made of rigid or semi-rigid metal.
When in place, the duct must have no more than
four 90° bends and must not exceed length listed in
INSTALLATION INSTRUCTIONS.
Electric dryer is connected to a 208 volt
circuit.
Drying time will be 20% longer than drying on a 240
volt circuit.
Drying procedures have not been followed. See “Operating Instructions.”
Outside exhaust hood or exhaust duct may
be clogged or restricted.
Clean out any obstruction.
High humidity. Use a dehumidifi er near the dryer.
Excessive wrinkling. Dryer is overloaded. Do not overload. See “Operating Instructions.”
Items left in dryer too long. Remove items as soon as cycle ends.
Insuffi cient sorting of items. See “Operating Instructions.”
Drying temperature too high. Follow fabric care label instructions.
Scratching or chipping
of the drum fi nish.
Foreign objects such as coins, pins, clips or
buttons are inside the dryer.*
Always remove foreign objects from pockets before
laundering. Remove objects from drum and restart dryer.
Permanently attached items such as belt
buckles, zippers and fasteners may be hitting
the inside of the drum.*
It may be necessary to sew a scrap of material
securely around ornaments before drying to prevent
scratching and damage to the dryer.
*Drum damage caused by foreign objects or permanently attached items is not covered by the warranty.


Find Your Products By Category
- Lawn and Garden
- Computer Equipment
- TV and Video
- Laundry Appliance
- Kitchen Appliance
- Car Audio and Video
- Automotive
- Photography
- Fitness & Sports
- Personal Care
- Communications
- Home Audio
- Portable Media
- Musical Instruments & Equipment
- Baby
- Household Appliance
- Cell Phone
- Marine Equipment
- Outdoor Cooking
- Power Tools
- Video Game
Please Login
