

2.6
Owner's of the Frigidaire Washer/Dryer FFLE1011MW gave it a score of 2.6 out of 5. Here's how the scores stacked up:


14
Drying Procedures
(Mesh bag not included.)
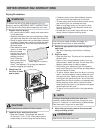
WARNING
To reduce the risk of fi re, electric shock or injury to
persons, read the IMPORTANT SAFETY INSTRUCTIONS
in this Use and Care Guide before operating your dryer.
CAUTION
Do not operate dryer without lint fi lter in place.
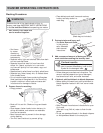
1 Prepare load for drying.
• Dry items of similar fabric, weight and construction
in the same load.
• Separate dark items from light-colored items. Sepa-
rate items that shed lint from those that attract lint.
• Check for stains which may not have been removed
in washing. Repeat stain removal process and wash
again before drying. Dryer heat may permanently
set some stains.
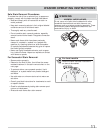
• Place delicate or small
items in a mesh bag.
• Be sure buckles,
buttons and trim are
heatproof and won’t
damage the drum
fi nish. Close zip-
pers, button buttons,
fasten hooks and
Velcro
®
-like fasteners. Tie strings and sashes to
prevent snagging and tangling.
2 Check that the
lint fi lter is clean
and in place.
Í
NOTE
Over-drying can cause wrinkles, shrinkage, lint,
harshness and a build up of static electricity.
Í
NOTE
If drying a single large or bulky item, such as a
comforter, remove the item part way through the cycle
and turn it “inside out” to maximize drying effectiveness.
Place item back in dryer and re-start cycle.
• If desired, place a dryer fabric softener sheet on
top of the load at the beginning of the cycle.
• To save energy and time and avoid uneven drying
and wrinkling, do not overload the dryer.
• When drying large items, dry only two or three
items at a time. Fill out the load with small and
medium sized items.
• For delicate or very small loads, add two or three
similar items to improve tumbling action.
IMPORTANT
Clean the lint fi lter after every load.
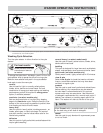
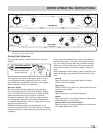
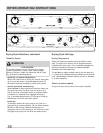
4 Select the appropriate cycle and settings for
each load.
• See
Dryer Operating Instructions
on following
pages.
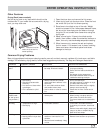
5 Start the dryer.
• Close the dryer door. The dryer will not operate with
the door open.
• Push in or turn the cycle selector knob or turn any
option knob to “wake” the dryer. You will hear three
beeps to indicate dryer is ready to operate.
• After making your selections, push in the selector
knob to start the cycle. You will hear one beep before
the drum begins to rotate.
• To add or remove items when the dryer is running,
push in the cycle selector knob to pause the cycle
and open the door. Opening the door with a cycle
running will also pause the cycle.
You will hear two
beeps.
Allow the drum to come to a complete stop
before reaching inside. Add or remove the item,
close the door and push in the selector knob again,
continuing the current cycle.
• To stop a running cycle, push in the cycle selector
knob.
DRYER OPERATING INSTRUCTIONS
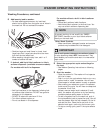
3 Load the dryer and close the door.
• Load items loosely. The average wet load will
fi ll the drum 1/3 to 1/2 full. Items need room to
tumble freely for even drying and less wrinkling.
6 When the cycle ends, remove items immedi-
ately and hang or fold.


Find Your Products By Category
- Lawn and Garden
- Computer Equipment
- TV and Video
- Laundry Appliance
- Kitchen Appliance
- Car Audio and Video
- Automotive
- Photography
- Fitness & Sports
- Personal Care
- Communications
- Home Audio
- Portable Media
- Musical Instruments & Equipment
- Baby
- Household Appliance
- Cell Phone
- Marine Equipment
- Outdoor Cooking
- Power Tools
- Video Game
Please Login
