

0
Owner's of the Pioneer Car Stereo System Pioneer Car Stereo System gave it a score of 0 out of 5. Here's how the scores stacked up:


2 Use M.C. to select the QuickMix or de-
sired station.
Changing the sort order
1 Press
(list).
! ABC – You can sort the items in the list alphabeti-
cally
! DATE – You can sort the items in the list in order
of the dates on which the items were created
Changing QuickMix or stations
1 Turn M.C.
Playing
1 When QuickMix or the station is selected, press
M.C.
Function settings
1 Press M.C. to display the main menu.
2 Turn M.C. to change the menu option
and press to select FUNCTION.
3 Turn M.C. to select the function.
After selecting, perform the following proce-
dures to set the function.
Bookmark (bookmark)
1 Press M.C. to store track information.
Pause (pause)
1 Press M.C. to pause or resume.
Sound Retriever (sound retriever)
1 Press M.C. to select the desired setting.
1—2—OFF (off)
1 is effective for low compression rates, and 2 is
effective for high compression rates.
Audio adjustments
Operation modes
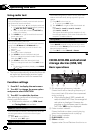
This unit features two operation modes: the 3-
way network mode (NW) and the standard
mode (STD). You can switch between modes
as desired. Initially, the DSP setting is set to
the standard mode (STD). (Refer to Switching
the DSP setting mode on page 5.)
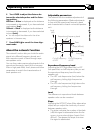
! The 3-way network mode (NW) lets you cre-
ate a 3-way multi-amp, multi-speaker sys-
tem with separate speakers for
reproduction of high, middle and low fre-
quencies (bands), each driven by a dedi-
cated power amp. The 3-way network mode
provides network and time alignment func-
tions, two functions essential for a multi-
amp, multi-speaker system, to enable pre-
cise control over settings for each fre-
quency range.
! The standard mode (STD) lets you create a
4-speaker system with front and rear speak-
ers, or a 6-speaker system with front and
rear speakers and subwoofers.
Important
This unit's audio settings will continue to remain
in the memory even if the battery is disconnected
or the microprocessor reset. If you want to reset
the audio settings, refer to AUDIO reset (audio
reset) on page 36.
Operation mode marks
This manual uses the following marks to make
the description clear.
: This mark indicates a function only in
3-way network mode or an operation in 3-way
network mode.
: This mark indicates a function available
only in standard mode or an operation in stan-
dard mode.
! The functions and operations which do not
carry either mark are commonly used in
the 3-way network mode and standard
mode.
3-way network mode
Adjusting the audio easily
By carrying out the following settings/adjust-
ments in the order shown, you can effortlessly
create a finely-tuned sound field.
1 Using the position selector (POSI)
2 Auto TA and EQ (auto-time alignment and auto-
equalizing)
3 Using balance adjustment (BAL)
4 Recalling equalizer curves
En
19
Section
02
Operating this unit
Operating this unit


Find Your Products By Category
- Lawn and Garden
- Computer Equipment
- TV and Video
- Laundry Appliance
- Kitchen Appliance
- Car Audio and Video
- Automotive
- Photography
- Fitness & Sports
- Personal Care
- Communications
- Home Audio
- Portable Media
- Musical Instruments & Equipment
- Baby
- Household Appliance
- Cell Phone
- Marine Equipment
- Outdoor Cooking
- Power Tools
- Video Game
Please Login
