

0
Owner's of the Pioneer Car Stereo System Pioneer Car Stereo System gave it a score of 0 out of 5. Here's how the scores stacked up:


4 Press M.C. to display the setting mode.
# You can also switch between the audio func-
tions in reverse order by turning M.C. counter-
clockwise.
# When selecting FM as the source, you cannot
switch to SLA.
# When selecting OFF in TA1, you cannot
switch to TA2.
# You can select SW 2 and SW 3 only when sub-
woofer output is turned on in SW 1.
# To return to the display of each source, press
BAND/
.
Notes
! If you do not operate the audio function within
about 30 seconds, the display is automatically
returned to the source display.
! EQ 2 (16-band graphic equalizer), TA2 (time
alignment adjusting), NW 1 (network adjust-
ment 1), NW 2 (network adjustment 2), NW 3
(network adjustment 3) and NW 4 (network
adjustment 4) functions are not canceled
automatically.
Switching left and rig ht channel
You can adjust following functions for left and
right channel independently or commonly.
3-way network mode
! Adjusting network (NW 1, NW 2, NW 3)
! Adjusting the 16-band graphic equalizer
(EQ 2)
Standard mode
! Adjusting subwoofer settings (SW 2)
! Adjusting low pass filter attenuation slope
(SW 3)
! Setting the high pass filter for front speakers
(F.HPF 1, F.HPF 2)
! Setting the high pass filter for rear speakers
(R.HPF 1, R.HPF 2)
! Adjusting the 16-band graphic equalizer
(EQ 2)
1 Use M.C. to select the audio function
described above.
2 Press M.C. and hold to switch between
left/right common mode and left/right in-
dependent mode.
L/R (left/right common mode)—Left (left)—
Right (right)
3 Adjust these functions as desired.
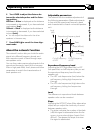
Using the position selector
One way to assure a more natural sound is to
clearly position the stereo image, putting you
right in the center of the sound field. The posi-
tion selector function lets you automatically
adjust the speakers’ output levels and inserts
a delay time to match the number and posi-
tion of occupied seats.
1 Use M.C. to select POSI in the audio
function menu.
Refer to Introduction of audio adjustments on
the previous page.
2 Turn LEVER to select a listening posi-
tion.
OFF (off)—Front Left (front seat left)—
Front Right (front seat right)—Front (front
seats)—All (all seats
)
Using balance adjustment
You can select a balance setting that provides
an ideal listening environment in all occupied
seats.
! This function is only available in 3-way net-
work mode
.
1 Use M.C. to select BAL.
Refer to Introduction of audio adjustments on
the previous page.
2 Turn LEVER to adjust the left/right
speaker balance.
Left 25 to Right 25 is displayed as the left/
right speaker balance moves from left to right.
En
21
Section
02
Operating this unit
Operating this unit


Find Your Products By Category
- Lawn and Garden
- Computer Equipment
- TV and Video
- Laundry Appliance
- Kitchen Appliance
- Car Audio and Video
- Automotive
- Photography
- Fitness & Sports
- Personal Care
- Communications
- Home Audio
- Portable Media
- Musical Instruments & Equipment
- Baby
- Household Appliance
- Cell Phone
- Marine Equipment
- Outdoor Cooking
- Power Tools
- Video Game
Please Login
