
0
Owner's of the Razor Mobility Scooter Razor Mobility Scooter gave it a score of 0 out of 5. Here's how the scores stacked up:


5
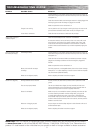
REPAIR AND MAINTENANCE
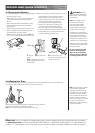
Note: The pressurized air supplies
found at gasoline stations are
designed to inflate high-volume
automobile tires. If you decide to
use such an air supply to inflate
tires, first make sure the pressure
gauge is working, then use very
short bursts to inflate to the correct
PSI. If you inadvertently over-
inflate the tire, release the excess
pressure immediately.
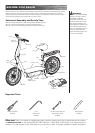
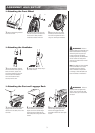
1 Using a bicycle style pump equipped for a Schrader-type valve, inflate the
tires to the PSI indicated on the sidewall of the tires.
Note: Low air pressure can decrease the ride time of your unit.
q Inflating the Tires
Tires are inflated when shipped, but they invariably lose some pressure between the point of manufacturing and
your purchase. Low tire pressure can decrease the ride time of your unit.
q Charging the Battery
Your electric scooter may not have a fully charged battery. Therefore it is a good idea to charge the battery prior to use.
2 Turn power to the “OFF”
position. Plug the charger into the
charger port as shown.
1 Plug the charger plug into a wall
outlet.
Note: If charger lights do not turn
on when plugged into the wall, try
another outlet.
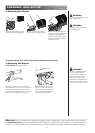
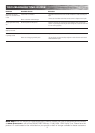
LED Light
WARNING: Always
disconnect your EcoSmart Metro
electric scooter from the charger
before cleaning.
Note: If your charger does not
look like the one illustrated,
your unit has been supplied
with an alternative charger.
The specifications and charging
procedure would not change.
The charger has a small window
with one LED to indicate the charge
status. Refer to the illustration
on the charger unit for the actual
“charging” and “charged” status
indications for your model charger.
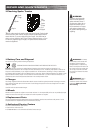
Chargers have built-in over-charge
protection to prevent battery from
being over-charged.
Be sure to properly align the
groove on the charger input
plug with the corresponding
socket on the case; otherwise,
no charging action will occur.
Charger
Plug
Charger
Port
• Initial charge time: 12 hours
• Recharge time: up to 12 hours, even if the light turns
green. Recommended maximum charging time is
24 hours.
• Always charge the battery immediately after riding.
• Fully charge battery before storing for extended
periods of time.
• Unplug charger from the wall outlet when not in use.
• Failure to recharge battery periodically may result in
a battery that will not accept a charge.
• Make sure scooter power switch is turned OFF when
unit is not in use. If the power switch is left on for an
extended period of time, the battery may reach a
stage at which it will no longer hold a charge.
• To ensure long battery life, never store the product
in freezing or below freezing temperatures!
Freezing will permanently damage the battery.
• Run time: Up to 40 minutes of continuous ride
time. Run time may vary depending on riding
conditions, climate and/or proper maintenance.
• Constant stopping and starting may shorten ride time.
• Average battery life for a properly maintained unit
is approx. 250 charge/discharge cycles.
Need Help? Visit our website for replacement parts, product support and a list of authorized service centers
at www.razor.com or call toll free 866-467-2967 Monday - Friday 8AM - 5PM Pacific Time. Please have the
product I.D. code located on the white label on your product or back of charger available for better assistance.


Find Your Products By Category
- Lawn and Garden
- Computer Equipment
- TV and Video
- Laundry Appliance
- Kitchen Appliance
- Car Audio and Video
- Automotive
- Photography
- Fitness & Sports
- Personal Care
- Communications
- Home Audio
- Portable Media
- Musical Instruments & Equipment
- Baby
- Household Appliance
- Cell Phone
- Marine Equipment
- Outdoor Cooking
- Power Tools
- Video Game
Please Login
