
0
Owner's of the Brother Sewing Machine Computerized Embroidery Machine gave it a score of 0 out of 5. Here's how the scores stacked up:


GETTING READY — — — — — — — — — — — — — — — — — — — — — — — — — — — — — — — — — — — — — — — — — — — —
14
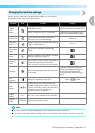
Embroidery Step by Step
The basic steps for embroidery are as follows.
↓
↓
↓
↓
↓
↓
↓
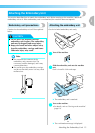
1
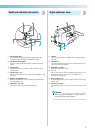
Attaching the embroidery
unit
Attach the embroidery unit. (If the embroidery unit is not attached, the
machine does not operate.)
For details, refer to “Attaching the embroidery unit” (page 15).
2 Checking the needle
Use a needle matched to the fabric.
For details on replacing the needle, refer to “Replacing the needle” (page
36).
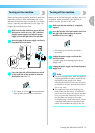
3
Setting up the bobbin
thread
For the bobbin thread, wind embroidery bobbin thread and set it in
place.
For details, refer to “Winding/Installing the Bobbin” (page 24).
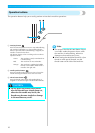
4 Preparing the fabric
Attach a stabilizer material to the fabric, and hoop it in an embroidery
frame.
For details, refer to “Preparing the Fabric” (page 42).
5
Attaching the embroidery
frame
Attach the embroidery frame to the embroidery unit.
For details, refer to “Attaching the Embroidery Frame” (page 47).
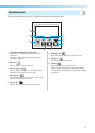
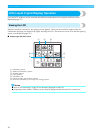
6 Selecting a pattern
Select an embroidery pattern.
For details, refer to “Selecting Embroidery Patterns” (page 49).
7 Checking the layout
Check and adjust the size and position of the embroidery pattern.
For details on adjusting the layout, refer to “Adjusting the layout” (page
61).
8
Setting up the embroidery
thread
Set up the embroidery thread according to the pattern.
For details, refer to “Upper Threading” (page 30).


Find Your Products By Category
- Lawn and Garden
- Computer Equipment
- TV and Video
- Laundry Appliance
- Kitchen Appliance
- Car Audio and Video
- Automotive
- Photography
- Fitness & Sports
- Personal Care
- Communications
- Home Audio
- Portable Media
- Musical Instruments & Equipment
- Baby
- Household Appliance
- Cell Phone
- Marine Equipment
- Outdoor Cooking
- Power Tools
- Video Game
Please Login
