
0
Owner's of the Brother Sewing Machine Computerized Embroidery Machine gave it a score of 0 out of 5. Here's how the scores stacked up:

58
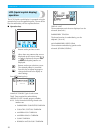
EMBROIDERY — — — — — — — — — — — — — — — — — — — — — — — — — — — — — — — — — — — — — — — — — — — — —
c
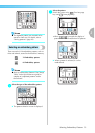
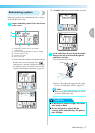
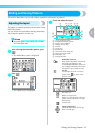
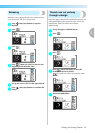
Lower the presser foot lever.
a Presser foot lever
d
Press (Start/stop button).
a Start/stop button
e
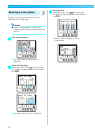
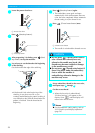
After progressing 5-6 stitches, press (Start/
stop button) to stop the machine.
f
Use scissors to cut the thread at the beginning
of the stitching.
Cut the thread at the edge of the stitching.
• If the thread is left at the beginning of the
stitching, it may be sewn over as you
continue embroidering the pattern, making it
very difficult to deal with the thread after the
pattern is finished. Trim the thread at the
beginning.
g
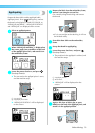
Press (Start/stop button) again.
X The embroidery starts again and stops
automatically with reinforcement after one
color has been completed. When automatic
thread cutting is set, the thread is cut.
h
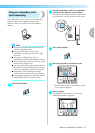
Press (Thread cutter button) once.
a Thread cutter button
X The needle is raised and the threads are cut.
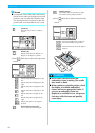
CAUTION
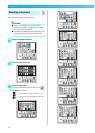
i
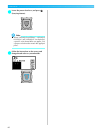
Set up embroidery thread for the next color,
and repeat steps
a through h.
j
Cut the excess thread.
X When the last color is embroidered,
“Finished sewing.” will appear on the
display. Press , and the display will
return to the initial screen.
Memo
z For the automatic cutting setting, refer to
“LCD (liquid crystal display) operation”
(page 50).
1
1
● Do not press (Thread cutter button)
after threads have already been cut,
otherwise the needle may break, the
threads may become tangled or damage
to the machine may occur.
● Do not press (Thread cutter button) if
there is no fabric under the embroidery
foot or while the machine is
embroidering, otherwise damage to the
machine may occur.
1


Find Your Products By Category
- Lawn and Garden
- Computer Equipment
- TV and Video
- Laundry Appliance
- Kitchen Appliance
- Car Audio and Video
- Automotive
- Photography
- Fitness & Sports
- Personal Care
- Communications
- Home Audio
- Portable Media
- Musical Instruments & Equipment
- Baby
- Household Appliance
- Cell Phone
- Marine Equipment
- Outdoor Cooking
- Power Tools
- Video Game
Please Login
