
0
Owner's of the Canon Digital Camera 9169B001 gave it a score of 0 out of 5. Here's how the scores stacked up:


134
Before Use
Basic Guide
Advanced Guide
Camera Basics
Auto Mode
Other Shooting
Modes
P Mode
Playback Mode
Wi-Fi Functions
Setting Menu
Accessories
Appendix
Index
Hybrid Auto /
Dual Capture Mode
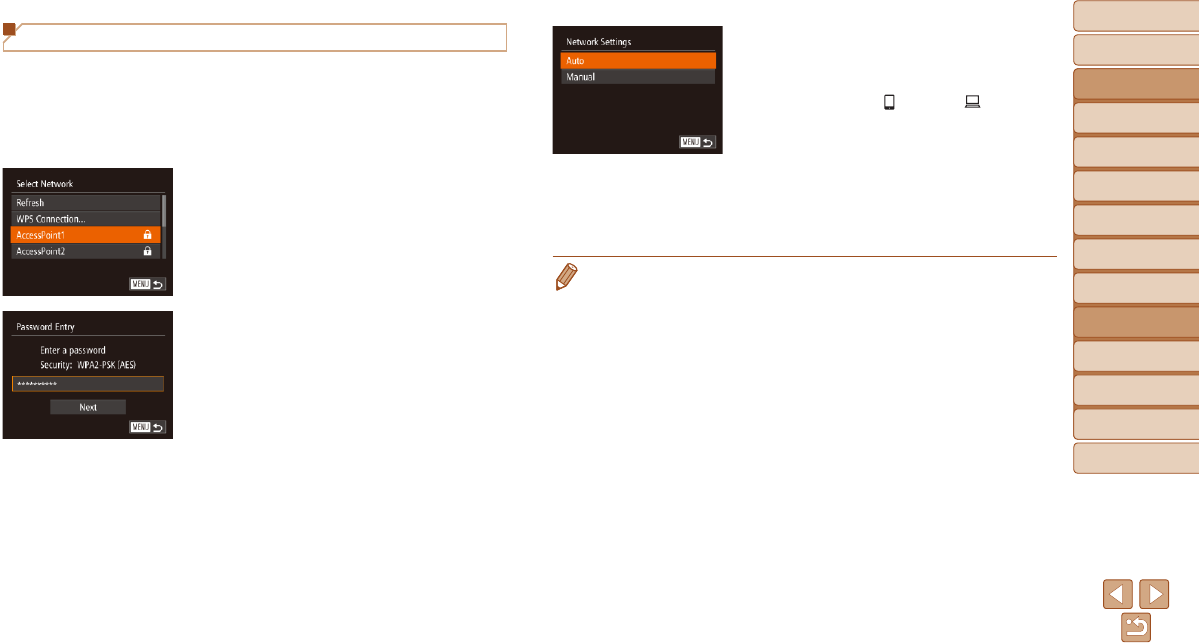
Connecting to Access Points in the List
1 View the listed access points.
View the listed networks (access
points) as described in steps 1 – 4 of
“Connecting to WPS-Compatible Access
Points” (=
130).
2 Choose an access point.
Press the <o><p> buttons to choose a
network (access point), and then press
the <m> button.
3 Enter the access point
password.
Press the <m> button to access the
keyboard, and then enter the password
(=
129).
Press the <o><p> buttons to choose
[Next], and then press the <m> button.
4 Choose [Auto].
Press the <o><p> buttons to choose
[Auto], and then press the <m> button.
If you selected [ ], [2], or [ ] as the
target device, see “Connecting to WPS-
Compatible Access Points”, starting with
step 9 (=
132).
If you selected a Web service as the
destination, see “Connecting to WPS-
Compatible Access Points”, starting with
step 12 (=
133).
• To determine the access point password, check on the access point itself or
refer to the user manual.
• Up to 16 access points will be displayed. If no access points are detected,
choose [Manual Settings] in step 2 to manually set an access point. Follow on-
screen instructions and enter an SSID, security settings, and a password.
• When you use an access point that you have already connected to for
connecting to another device, [*] is displayed for the password in step 3. To
use the same password, press the <o><p> buttons to choose [Next], and
then press the <m> button.


Find Your Products By Category
- Lawn and Garden
- Computer Equipment
- TV and Video
- Laundry Appliance
- Kitchen Appliance
- Car Audio and Video
- Automotive
- Photography
- Fitness & Sports
- Personal Care
- Communications
- Home Audio
- Portable Media
- Musical Instruments & Equipment
- Baby
- Household Appliance
- Cell Phone
- Marine Equipment
- Outdoor Cooking
- Power Tools
- Video Game
Please Login
